segunda-feira, 12 de novembro de 2018

Regra Basicas de Firewall do Mikrotik RB 750


Drop port scanners


To protect the Router from port scanners, we can record the IPs of hackers who try to scan your box. Using this address list we can drop connection from those IP
in /ip firewall filter
add chain=input protocol=tcp psd=21,3s,3,1 action=add-src-to-address-list address-list="port scanners" address-list-timeout=2w comment="Port scanners to list " disabled=no
Various combinations of TCP flags can also indicate port scanner activity.
add chain=input protocol=tcp tcp-flags=fin,!syn,!rst,!psh,!ack,!urg action=add-src-to-address-list address-list="port scanners" address-list-timeout=2w comment="NMAP FIN Stealth scan"
add chain=input protocol=tcp tcp-flags=fin,syn action=add-src-to-address-list address-list="port scanners" address-list-timeout=2w comment="SYN/FIN scan"
add chain=input protocol=tcp tcp-flags=syn,rst action=add-src-to-address-list address-list="port scanners" address-list-timeout=2w comment="SYN/RST scan"
add chain=input protocol=tcp tcp-flags=fin,psh,urg,!syn,!rst,!ack action=add-src-to-address-list address-list="port scanners" address-list-timeout=2w comment="FIN/PSH/URG scan"
add chain=input protocol=tcp tcp-flags=fin,syn,rst,psh,ack,urg action=add-src-to-address-list address-list="port scanners" address-list-timeout=2w comment="ALL/ALL scan"
add chain=input protocol=tcp tcp-flags=!fin,!syn,!rst,!psh,!ack,!urg action=add-src-to-address-list address-list="port scanners" address-list-timeout=2w comment="NMAP NULL scan"
Then you can drop those IPs:
add chain=input src-address-list="port scanners" action=drop comment="dropping port scanners" disabled=no
Similarly, you can drop these port scanners in the forward chain, but using the above rules with "chain=forward".


Bruteforce login prevention

https://wiki.mikrotik.com/wiki/Bruteforce_login_prevention

To stop SSH/FTP attacks on your router, follow this advice.
This configuration allows only 10 FTP login incorrect answers per minute
in /ip firewall filter
add chain=input protocol=tcp dst-port=21 src-address-list=ftp_blacklist action=drop \
comment="drop ftp brute forcers"

add chain=output action=accept protocol=tcp content="530 Login incorrect" dst-limit=1/1m,9,dst-address/1m

add chain=output action=add-dst-to-address-list protocol=tcp content="530 Login incorrect" \
address-list=ftp_blacklist address-list-timeout=3h

This will prevent a SSH brute forcer to be banned for 10 days after repetitive attempts. Change the timeouts as necessary.

in /ip firewall filter
add chain=input protocol=tcp dst-port=22 src-address-list=ssh_blacklist action=drop \
comment="drop ssh brute forcers" disabled=no

add chain=input protocol=tcp dst-port=22 connection-state=new \
src-address-list=ssh_stage3 action=add-src-to-address-list address-list=ssh_blacklist \
address-list-timeout=10d comment="" disabled=no

add chain=input protocol=tcp dst-port=22 connection-state=new \
src-address-list=ssh_stage2 action=add-src-to-address-list address-list=ssh_stage3 \
address-list-timeout=1m comment="" disabled=no

add chain=input protocol=tcp dst-port=22 connection-state=new src-address-list=ssh_stage1 \
action=add-src-to-address-list address-list=ssh_stage2 address-list-timeout=1m comment="" disabled=no

add chain=input protocol=tcp dst-port=22 connection-state=new action=add-src-to-address-list \
address-list=ssh_stage1 address-list-timeout=1m comment="" disabled=no
If you want to block downstream access as well, you need to block the with the forward chain:
add chain=forward protocol=tcp dst-port=22 src-address-list=ssh_blacklist action=drop \
comment="drop ssh brute downstream" disabled=no
To view the contents of your Blacklist, go to "/ip firewall address-list" and type "print" to see the contents.
segunda-feira, 8 de outubro de 2018

VPN automatica no Windows


VPN automatica no Windows


Já precisou alguma vez fazer com que o Windows se conectasse altomaticamente em uma VPN antes do Logon.

Segue uma solução para o problema que vem funcionando muito bem para mim.

Para seu funcionamento será necessário à instalação de algumas ferramentas:
Pacote “Windows Server 2003 Resource Kit Tools” (que também pode ser instalado no Windows XP e 2000), o mesmo pode ser baixado através dos site http://www.microsoft.com/en-us/download/details.aspx?id=17657 .

Após instalar o pacote crie uma conexão VPN normalmente coloque para reconectar automaticamente caso caia a conexão utilizei em minha configuração até 1000 tentativas após salvar e testar sua VPN crie um arquivo com extensão tipo “bat” e inclua o texto abaixo:


@echo off
sleep 30

:Loop
ping www.google.com -n 1 || goto Loop

:Attempt
C:\windows\system32\rasdial.exe nome_conexão usuario senha && goto Connected || goto Failed

:Failed
echo Connection failed on %date% %time% > c:\vpnlog.txt
sleep 300
goto Attempt

:Connected
echo Connection completed on %date% %time% > c:\vpnlog.txt

:Finish
echo on


Após criar o arquivo configure o agendador de tarefas do Windows para executar a tarefa ao iniciar e desabilite a opção Executar somente se conectado. Reinicie a maquina e a conexão devera ocorrer no inicio do windows antes do logon.

Autor:
https://sqlshow.wordpress.com/2013/05/11/vpn-automatica-no-windows/ 

terça-feira, 11 de setembro de 2018

Path pelo Linux Debian Ubuntu Linux Mint $PATH


#vi /etc/profile

# You may uncomment the following lines if you want `ls' to be colorized:
export LS_OPTIONS='--color=auto'
eval `dircolors`
alias ls='ls $LS_OPTIONS'
alias la='ls $LS_OPTIONS -la'
alias l='ls $LS_OPTIONS -l'
alias ll='ls $LS_OPTIONS -l'
alias dir='dir $LS_OPTIONS'
#
# Some more alias to avoid making mistakes:
alias rm='rm -i'
alias cp='cp -i'
alias mv='mv -i'
alias cds='cd /etc/init.d ; ls'
alias src-kernel='cd /usr/src/linux ; l'
alias limpa-memoria2='echo 3 > /proc/sys/vm/drop_caches'
alias limpa-memoria='sudo sysctl -w vm.drop_caches=3'
# alias mount-sdcard='mount -t vfat -o rw,uid=1000 ' + $dev_mmc + ' /mnt/sdcard'

#vi /root/.bachrc

#Exporta os novos path do SAMBA4 personalizado 
export PATH=$PATH:'/opt/samba/bin:/opt/samba/sbin'  


# You may uncomment the following lines if you want `ls' to be colorized:
export LS_OPTIONS='--color=auto'
eval `dircolors`
alias ls='ls $LS_OPTIONS'
alias la='ls $LS_OPTIONS -la'
alias l='ls $LS_OPTIONS -l'
alias ll='ls $LS_OPTIONS -l'
alias dir='dir $LS_OPTIONS'
#
# Some more alias to avoid making mistakes:
alias rm='rm -i'
alias cp='cp -i'
alias mv='mv -i'
alias cds='cd /etc/init.d ; ls'
alias src-kernel='cd /usr/src/linux ; l'
alias limpa-memoria2='echo 3 > /proc/sys/vm/drop_caches'
alias limpa-memoria='sudo sysctl -w vm.drop_caches=3'
# alias mount-sdcard='mount -t vfat -o rw,uid=1000 ' + $dev_mmc + ' /mnt/sdcard'


#vi /home/meu_usuario/.bachrc

#Exporta os novos path do SAMBA4 personalizado 
export PATH=$PATH:'/opt/samba/bin:/opt/samba/sbin'  


# You may uncomment the following lines if you want `ls' to be colorized:
export LS_OPTIONS='--color=auto'
eval `dircolors`
alias ls='ls $LS_OPTIONS'
alias la='ls $LS_OPTIONS -la'
alias l='ls $LS_OPTIONS -l'
alias ll='ls $LS_OPTIONS -l'
alias dir='dir $LS_OPTIONS'
#
# Some more alias to avoid making mistakes:
alias rm='rm -i'
alias cp='cp -i'
alias mv='mv -i'
alias cds='cd /etc/init.d ; ls'
alias src-kernel='cd /usr/src/linux ; l'
alias limpa-memoria2='echo 3 > /proc/sys/vm/drop_caches'
alias limpa-memoria='sudo sysctl -w vm.drop_caches=3'
# alias mount-sdcard='mount -t vfat -o rw,uid=1000 ' + $dev_mmc + ' /mnt/sdcard'


#vi /etc/sudoers

OBS: Adicionado path do SAMBA4 personalizado para sudo rodar. 

Defaults secure_path="/usr/local/sbin:/usr/local/bin:/usr/sbin:/usr/bin:/sbin:/bin:/snap/bin:/opt/samba/bin:/opt/samba/sbin"


sexta-feira, 8 de junho de 2018

Como excluir arquivos mais antigos do que X dias no Linux


Muitas vezes precisamos executar rotinas de limpeza em nossos computadores, de forma a excluir arquivos que não são mais utilizados para liberar espaço para novos arquivos. E, em alguns casos, priorizamos excluir os arquivos mais antigos.
Para excluir os documentos mais antigos do que um determinado número de dias no Linux, use o comando a seguir:
?
1
find /path/to/files* -mtime +X -exec rm {} \;
Em que:
  • /path/to/files é o diretório onde você pretende procurar e excluir os arquivos;
  • é o tempo de modificação dos arquivos. Significa que estamos procurando todos documentos cuja última modificação foi feita há mais de X dias.
Caso quiséssemos excluir todos arquivos dentro do diretório /home/drall cuja última modificação foi feita há 90 dias, usaríamos o seguinte comando:
?
1
find /home/drall -mtime +90 -exec rm {} \;

quarta-feira, 6 de junho de 2018

Aumentando o período de demonstração do Windows Server 2012


Aumentando o período de demonstração do Windows Server 2012

REARM Windows 2012 ou 8
Neste artigo veremos como estender o período de ativação do Windows Server 2012 .
Passo 1:  Cheque o tempo de teste restante, este procedimento também é valido caso a Licença já estava expirada
T03-IMG01
Passo 2: Abra o Prompt de Comando como administrador, vá no iniciar digite “CMD” após ele aparecer na tela clique com o botão direito do computador e selecione “Run as Administrator”
T03-IMG02
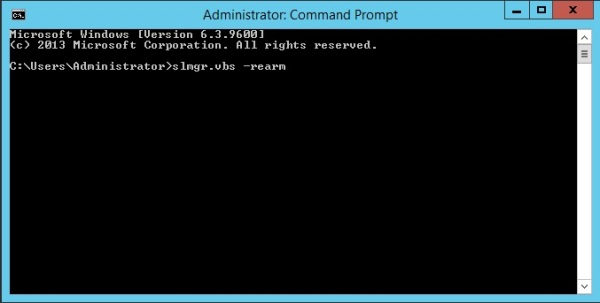
Passo 3: No Prompt de comando de o seguinte comando:  slmgr.vbs -rearm
T03-IMG03
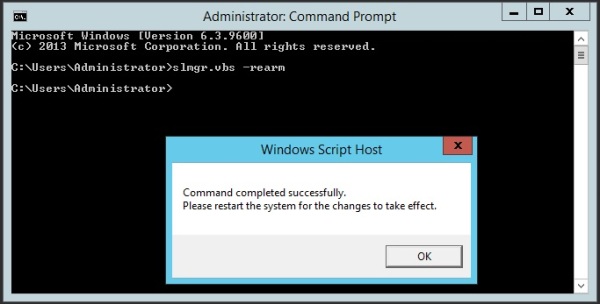
Passo 4: Após a mensagem de confirmação. Reinicie o computador e pronto você terá mais dias para testar o Windows.
T03-IMG04

quarta-feira, 25 de abril de 2018

Ativar o Remote Desktop Connection no Windows 7 Starter, Home Basic e Home Premium

O Remote Desktop Connection é uma funcionalidade nativa nas versões do Windows, que permite o acesso a ambientes de trabalho remoto, permitindo assim gerir máquinas ou prestar assistência a utilizadores que estejam numa localização geográfica diferente.
No Windows 7, o RDC apenas está disponível nas versões Professional, Enterprise e Ultimate.
Fora do ambiente empresarial, praticamente todos os utilizadores usam a versão Home Premium do Windows 7, mas que, não têm esta poderosa ferramenta activa nativamente.
Neste tutorial, vou explicar como activar esta funcionalidade nas versões Starter, Home Basic e Home Premium, recorrendo a um script desenvolvido por um anónimo. Além de activar o RDC nestas versões do Windows 7, este script, permite também manter activa mais que uma sessão em aberto, sem que para isso tenha que desligar um outro utilizador que esteja ligado.
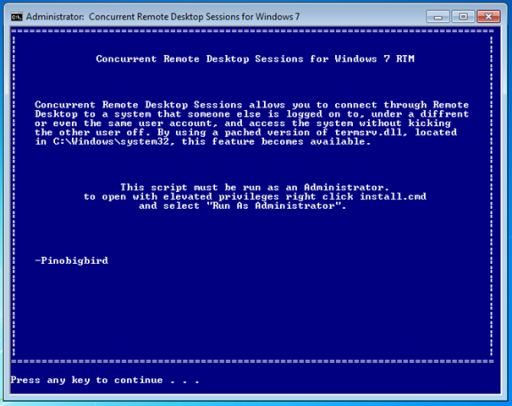
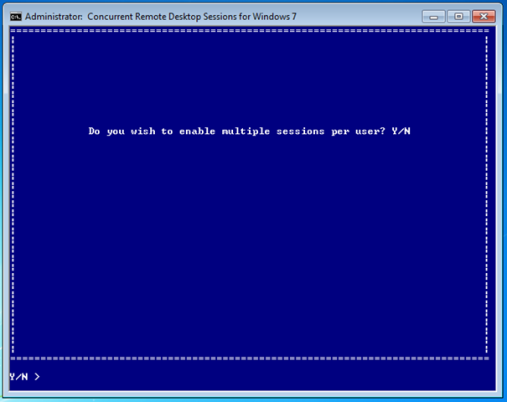
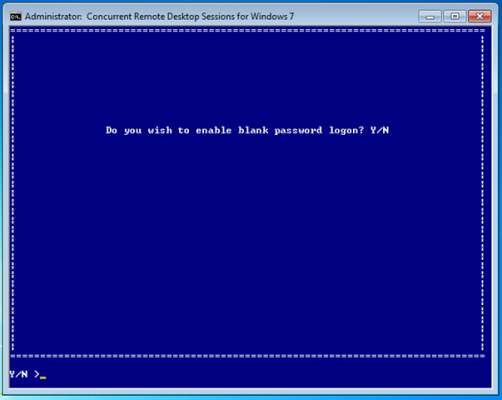
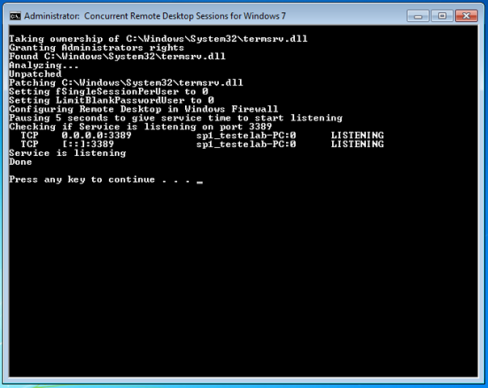
Em primeiro lugar, recomendo que criem um ponto de restauro antes de iniciar a execução do script, por forma a salvaguardar eventuais problemas.O script pode ser descarregado AQUI para o Windows 7 RTM ou AQUI para oWindows 7 Sp1 Uma vez, descompactada a pasta que contém o script e restantes ficheiros necessários, deverão clicar com o botão direito do rato em install.cmd e executar como administrador. Caso possuam o UAC activo deverão dar a respectiva autorização clicando em Sim.hprdc0O Script depois de executado, abrirá uma janela do command prompt. Clicar em qualquer tecla para continuar.hprdc1No passo seguinte será apresentada a seguinte questão: “Do you wish to enable multiple sessions per user ?“. Seleccionar Y (Yes) seguido de Enter.hprdc2De seguida terão que responder a “Do you wish to enable blank password logon?”. Seleccionar novamente Y (Yes) seguido de Enter.hprdc3Após estes passos, o script irá activar os ficheiros necessários e respectiva firewall, assim como os serviços necessários à execução do RDC. No final da configuração, pressionar qualquer tecla para finalizar.hprdc4E pronto, a partir de agora já poderá ligar-se a outros ambientes de trabalho remotos do seu Windows 7 Home Premium.Este método foi testado nos seguintes sistemas operativos:Windows 7 Starter 32 & 64 BitsWindows 7 Home Basic 32 & 64 bitsWindows 7 Home Premium 32 & 64 bits. Espero que este tutorial seja útil a quem me visita!Todos os créditos do script são do seu criador.


domingo, 25 de março de 2018

Como Alterar o uuid do disco da VirtualBox para que ele seja utilizado novamente


Depois de criar uma máquina virtual no VirtualBox queremos copiar o HD de mentira e subir outra máquina, ou seja, queremos clonar uma máquina.
Simplesmente copiamos o *.vdi e tentamos configurar uma nova máquina usando a imagem copiada e nos deparamos com um erro de UUID.
Para resolver isso basta alterar o UUID com o comando abaixo:
VBoxManage internalcommands setvdiuuid [nome do disco virtual]
Exemplo:
VBoxManage internalcommands setvdiuuid meu_hd_virtual.vdi
Nas na versão 4.3 ou superior mudou para:
VBoxManage internalcommands sethduuid “endereco_mais_nome_do_hd.vid

terça-feira, 20 de março de 2018

How to install Tomcat 8.5 on Debian 9 / Ubuntu 16.04 / Linux Mint 18

Requirement

First, switch to the root user.
su -
OR
sudo su -
Tomcat requires Java JDK to be installed on the machine. You can either install Oracle JDK or OpenJDK.
For this demo, I am going with OpenJDK.
apt-get -y install openjdk-8-jdk
Once Java is installed, you can verify the Java version by using the following command.
java -version
Output:
openjdk version "1.8.0_141"
OpenJDK Runtime Environment (build 1.8.0_141-8u141-b15-1~deb9u1-b15)
OpenJDK 64-Bit Server VM (build 25.141-b15, mixed mode

For best practice, Tomcat should never be run as privileged user (root). So, create a low-privilege user for running the Tomcat service.
groupadd tomcat
mkdir /opt/tomcat
useradd -g tomcat -d /opt/tomcat -s /bin/nologin tomcat
or
useradd -s /bin/false -g tomcat -d /opt/tomcat tomcat

Download & Configure Apache Tomcat

You can download the latest version of the Apache Tomcat from the official website.
wget http://www-us.apache.org/dist/tomcat/tomcat-8/v8.5.27/bin/apache-tomcat-8.5.27.tar.gz
Extract the tomcat on to your desired (/opt/tomcat) directory.
tar -zxvf apache-tomcat-*.tar.gz
mv apache-tomcat-8.5.27/* /opt/tomcat/
Change the ownership of the extracted directory so that tomcat user can write files to it.
chown -R tomcat:tomcat /opt/tomcat/

chmod +x /opt/tomcat/bin/*.sh 

Change the add in /etc/bash.bashrc  and /etc/profile  and /etc/environment
# Variaveis Java
JAVA_HOME=/usr/lib/jvm/java-8-oracle
CATALINA_HOME=/opt/tomcat
export JAVA_HOME
JRE_HOME=$JAVA_HOME/jre
export JRE_HOME
#PATH=$PATH:$JAVA_HOME/bin:$JRE_HOME/bin:
#export PATH
export CATALINA_HOME


Controlling Apache Tomcat

Manual

You can start and stop the Tomcat using the script which comes along with the package.
To start Tomcat service, go to the Tomcat directory and run:
cd /opt/tomcat/bin/
sh startup.sh
Output:
Using CATALINA_BASE:   /opt/tomcat
Using CATALINA_HOME:   /opt/tomcat
Using CATALINA_TMPDIR: /opt/tomcat/temp
Using JRE_HOME:        /usr
Using CLASSPATH:       /opt/tomcat/bin/bootstrap.jar:/opt/tomcat/bin/tomcat-juli.jar
Tomcat started.
To stop Tomcat service, run:
sh shutdown.sh

Change the ownership of the extracted directory so that tomcat user can write files to it.


chown -R tomcat:tomcat /opt/tomcat/

Systemd

We can also configure systemd to start the Tomcat service. Skip the below step in case you do not want to use systemd for managing Tomcat service.
Create a tomcat systemd service file. Green ones depend on the environmentso change them accordingly.
nano /etc/systemd/system/tomcat.service
Add the below information to Tomcat systemd service file.
[Unit]
Description=Apache Tomcat 8.x Web Application Container
Wants=network.target
After=network.target

[Service]
Type=forking

Environment=JRE_HOME=/usr/lib/jvm/java-8-oracle/jre
Environment=CATALINA_PID=/opt/tomcat/temp/tomcat.pid
Environment=CATALINA_HOME=/opt/tomcat
Environment='CATALINA_OPTS=-Xms512M -Xmx1G -Djava.net.preferIPv4Stack=true'
Environment='JAVA_OPTS=-Djava.awt.headless=true -Djava.security.egd=file:/dev/./urandom'

ExecStart=/opt/tomcat/bin/startup.sh
ExecStop=/opt/tomcat/bin/shutdown.sh
SuccessExitStatus=143

User=tomcat
Group=tomcat
UMask=0007
RestartSec=10
Restart=always

[Install]
WantedBy=multi-user.target
Reload systemd daemon.
systemctl daemon-reload
To start the Tomcat service; run:
systemctl start tomcat
Check the status of Tomcat, run:
systemctl status tomcat
Enable the auto start of Tomcat service on system boot:
systemctl enable tomcat

Verify Apache Tomcat
By default, Tomcat runs on port 8080. Use can use the netstat command to check the port status.
netstat -antup | grep 8080
or
netstat -plntu | grep 8080
Output:
tcp        0      0 0.0.0.0:8080            0.0.0.0:*               LISTEN      12224/java


Firewall

You may need to allow Tomcat server requests in the firewall so that we can access the application from the external network.
ufw allow 8080

Configure Apache Tomcat Web UI

Tomcat comes with the web-manager and Host Manager for managing Tomcat. Both Host Manager and Web Manager are password protected, and it requires a username and password to access.
Only the user with the manager-gui and admin-gui role is allowed to access web manager and host-manager respectively. Those two roles are defined in tomcat-users.xml file.
nano /opt/tomcat/conf/tomcat-users.xml
Place the following two lines (role and user definition) just above the last line.
manager-gui,admin-gui"/>
tomcat" password="admin" roles="manager-gui,admin-gui"/>

For security reason, Web Manager and Host Manager is accessible only from the localhost, ie, from the server itself.
If you want to access managers from the remote system then you need to add your source network in allow list. To do that, edit the below two files.
nano /opt/tomcat/webapps/manager/META-INF/context.xml

nano /opt/tomcat/webapps/host-manager/META-INF/context.xml
Update the below line on both files with source IP from which your accessing the Web and Host Manager. .* will allow everyone to have access to managers.
allow="127\.\d+\.\d+\.\d+|::1|0:0:0:0:0:0:0:1|.*" />
OR
You can allow only part of your network. For example, to allow only 192.168.0.0/24 network, you can use the below values.
allow="127\.\d+\.\d+\.\d+|::1|0:0:0:0:0:0:0:1|192.168.*" />
Restart the Tomcat service.
systemctl restart tomcat


netstat Command not found on Debian 9 / Ubuntu / Linux Mint – Quick Fix


netstat is a command line tool to view the network connection statistics to/from the machine. With netstat, you can see network connections, routing tables, interface statistics, masquerade connections, and multicast memberships.
Are you facing netstat command not found issue after the installation Debian 9 / Ubuntu / Linux Mint.
-bash: netstat: command not found
Here is the small guide to install the necessary package for getting netstat command. Let us see which package provides us netstat command.
apt-file search --regexp '/netstat$'
Output:
net-tools: /bin/netstat
From the above command, you can see that net-tools package provides you netstat command. So, install the net-toolspackage using the apt-get command.
apt-get install -y net-tools
Output:
Reading package lists... Done
Building dependency tree
Reading state information... Done
The following NEW packages will be installed:
 net-tools
0 upgraded, 1 newly installed, 0 to remove and 98 not upgraded.
Need to get 248 kB of archives.
After this operation, 963 kB of additional disk space will be used.
Get:1 http://deb.debian.org/debian stretch/main amd64 net-tools amd64 1.60+git20161116.90da8a0-1 [248 kB]
Fetched 248 kB in 0s (422 kB/s)
Selecting previously unselected package net-tools.
(Reading database ... 131147 files and directories currently installed.)
Preparing to unpack .../net-tools_1.60+git20161116.90da8a0-1_amd64.deb ...
Unpacking net-tools (1.60+git20161116.90da8a0-1) ...
Processing triggers for man-db (2.7.6.1-2) ...
Setting up net-tools (1.60+git20161116.90da8a0-1) ...
Once the installation is complete. Run netstat to see whether it is available or not.
netstat
Output:
Active Internet connections (w/o servers)
Proto Recv-Q Send-Q Local Address           Foreign Address         State
tcp        0      0 mydebian:ssh            192.168.1.5:55051       ESTABLISHED
tcp        0      0 mydebian:ssh            192.168.1.6:55368       ESTABLISHED
tcp        0     64 mydebian:ssh            192.168.1.6:55660       ESTABLISHED
Active UNIX domain sockets (w/o servers)
Proto RefCnt Flags       Type       State         I-Node   Path
unix  2      [ ]         DGRAM                    16007    /run/user/119/systemd/notify
unix  2      [ ]         DGRAM                    9360     /run/systemd/journal/syslog
unix  2      [ ]         DGRAM                    17319    /run/user/1000/systemd/notify
unix  3      [ ]         DGRAM                    9176     /run/systemd/notify
unix  2      [ ]         DGRAM                    9178     /run/systemd/cgroups-agent
unix  28     [ ]         DGRAM                    9190     /run/systemd/journal/dev-log
unix  8      [ ]         DGRAM                    9208     /run/systemd/journal/socket
unix  3      [ ]         STREAM     CONNECTED     23927    /run/user/1000/bus
unix  3      [ ]         STREAM     CONNECTED     22423    /run/systemd/journal/stdout
unix  3      [ ]         STREAM     CONNECTED     26620    /run/user/1000/bus
unix  3      [ ]         STREAM     CONNECTED     25601
unix  3      [ ]         STREAM     CONNECTED     23390    /run/systemd/journal/stdout
unix  3      [ ]         STREAM     CONNECTED     23284    /run/user/1000/bus
unix  3      [ ]         STREAM     CONNECTED     23270
unix  3      [ ]         STREAM     CONNECTED     23043
unix  3      [ ]         STREAM     CONNECTED     24356    /var/run/dbus/system_bus_socket
unix  3      [ ]         STREAM     CONNECTED     131096   /var/run/dbus/system_bus_socket
unix  3      [ ]         STREAM     CONNECTED     23046    /run/user/1000/bus
netstat Command not found on Debian - netstat command output
netstat Command not found on Debian – netstat command output
That’s All. You now have netstat command on your machine.